Docker Compose, Docker Engine, Storage, Registry, Container Orchestrate


Docker Compose
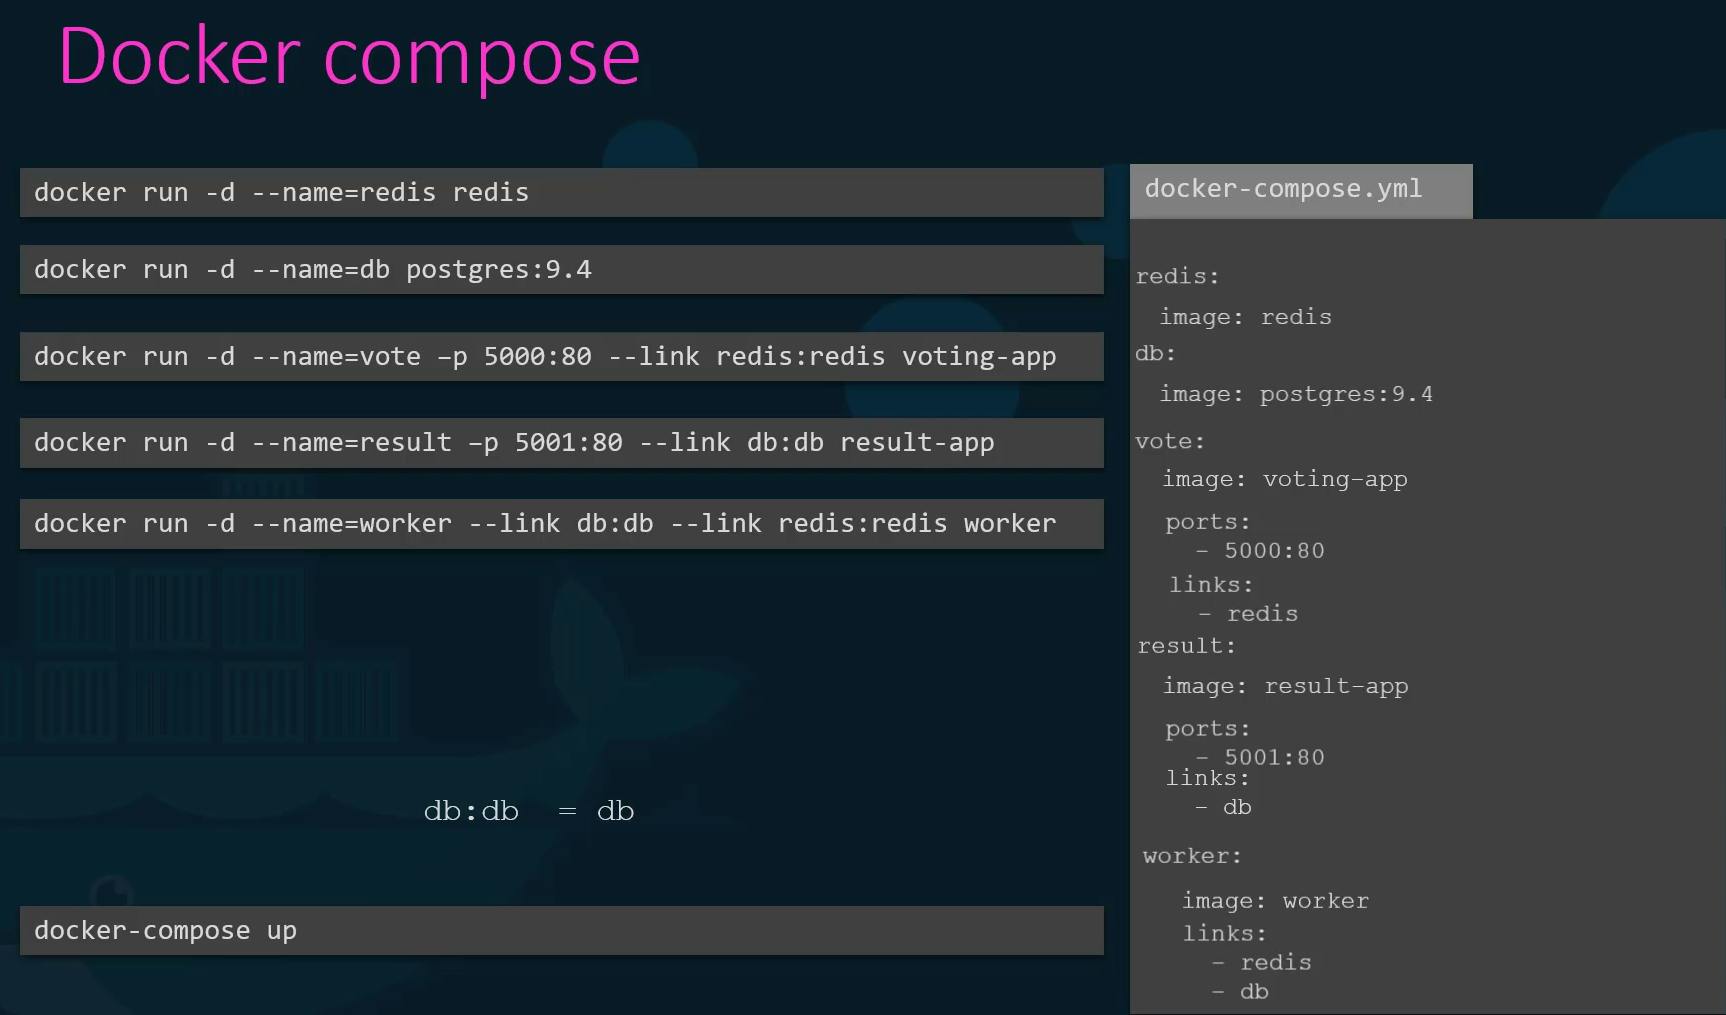
Docker Compose is a tool provided by Docker that allows you to define and manage multi-container Docker applications. It uses a YAML file to specify the services, networks, and volumes required by your application, making it easy to configure and deploy complex containerized environments.
With Docker Compose, you can define the services, their configurations, and the relationships between them in a single file. This simplifies the process of managing and scaling multi-container applications, as well as ensuring consistent configurations across different environments.
Here are the key components and concepts in Docker Compose:
YAML Configuration File: Docker Compose uses a YAML file (usually named docker-compose.yml) to define the services, networks, and volumes for your application.
Services: Services represent the containers in your application. Each service is defined with its image, environment variables, ports, volumes, and other configurations required to run the container.
Networks: Networks define how the services communicate with each other. Docker Compose creates a default network for your application, and you can also define custom networks for specific use cases.
Volumes: Volumes are used to persist and share data between containers. You can define named volumes or bind mount host directories to container directories.
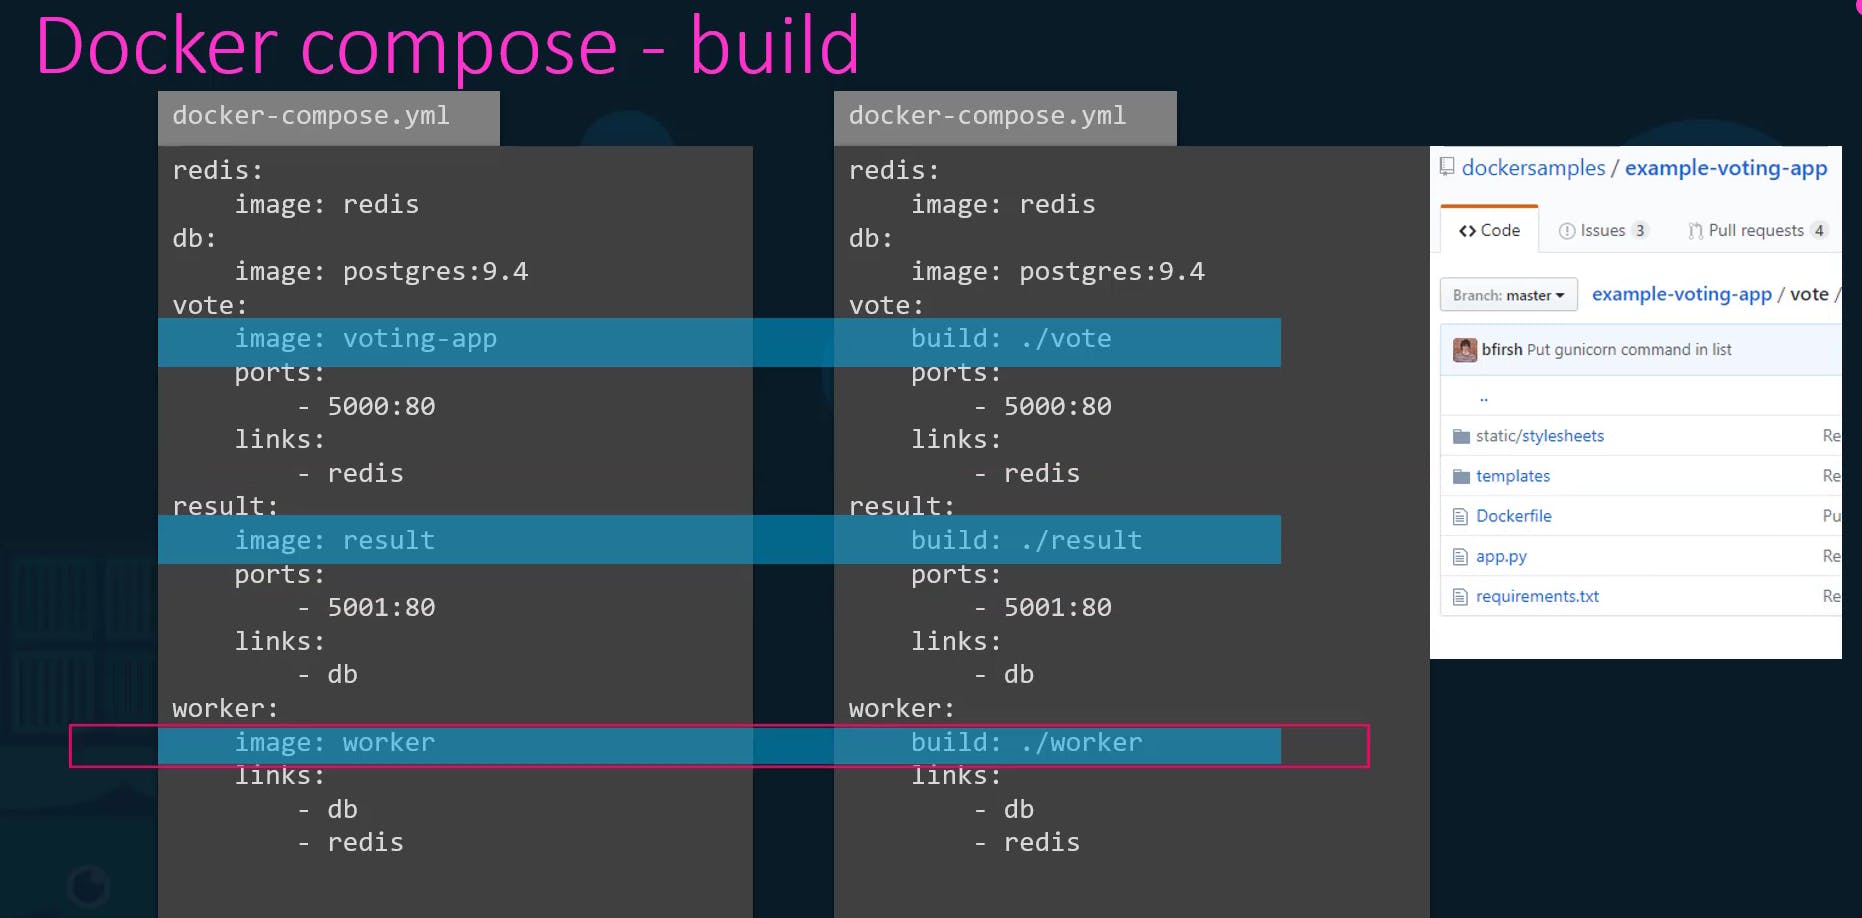
Build: Docker Compose supports building custom images using the
builddirective. You can specify the Dockerfile and build context for each service, allowing you to customize and automate the image building process.Environment Variables: Docker Compose allows you to set environment variables for each service, enabling dynamic configuration and easy parameterization of your application.
Commands: Docker Compose provides commands to manage your application, such as
upto start the application,downto stop it, andlogsto view the logs of the running services.
To use Docker Compose, you need to have it installed on your system. Once installed, you can create a docker-compose.yml file in your project directory, defining the services, networks, and volumes required for your application. Then, you can use the docker-compose command to manage your application.
Here are a few example commands:
docker-compose up: Starts the containers defined in thedocker-compose.ymlfile.docker-compose down: Stops and removes the containers, networks, and volumes defined in thedocker-compose.ymlfile.docker-compose logs: Displays the logs of the services defined in thedocker-compose.ymlfile.docker-compose build: Builds the Docker images for the services defined in thedocker-compose.ymlfile.

Please click on the links below for further reference:
https://docs.docker.com/compose/ https://docs.docker.com/engine/reference/commandline/compose/ https://github.com/dockersamples/example-voting-app
Docker Engine, Storage
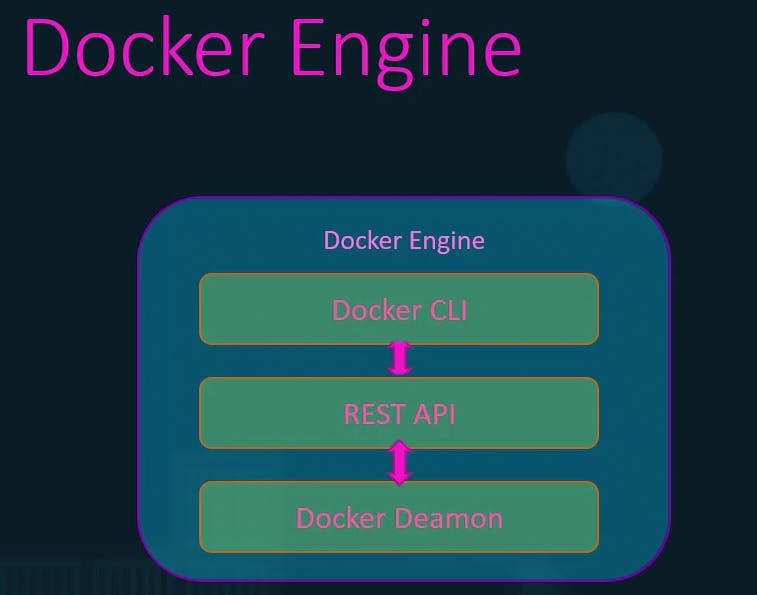
Docker Engine refers to a host with Docker installed on it. When you are installing Docker on a Linux host it includes 3 components:
Docker CL1 (It's a command line interface that we use to perform actions such as running containers, stopping containers, destroying images, etc.)
- It uses REST API to interact with the Docker Deamon
- It can be on another system/host as well and still work with a remote Docker engine. You can use -H on the docker command and specify the remote Docker engine address and Port
i.e
docker -H-remote-docker-engine:2375 docker -H-remote-docker-engine:2375 run ngnixRESET API (It's the API interface that programs can use to talk to the demon and provide instructions)
Docker Deamon (It's a background process that manages Docker objects such as Images containers, volumes, and networks )
Docker uses a namespace to isolate Workspace process ids networks, interprocess communication, mount, and Unix time-sharing systems are created in their own namespace thereby providing isolation between containers.

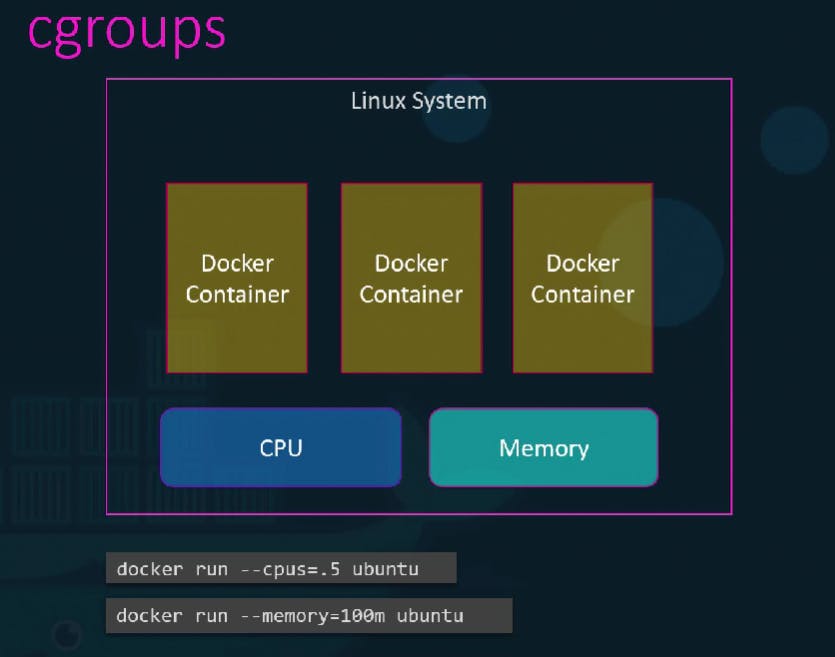
Note: Docker host as well as the Containers shared the same system resources such as CPU and memory. Docker uses cgroup (control groups ) to restrict the amount of hardware resources allocated to each container.
- Restrict the amount of CPU Or Memory for the container.
Restricting CPU for the container so it does not take up more than50% of the host CPU
docker run --cpu=.5 centos
For Memory
docker run --memory=100m centos
- When you install Docker on a system it created a folder structure at
/var/lib/docker


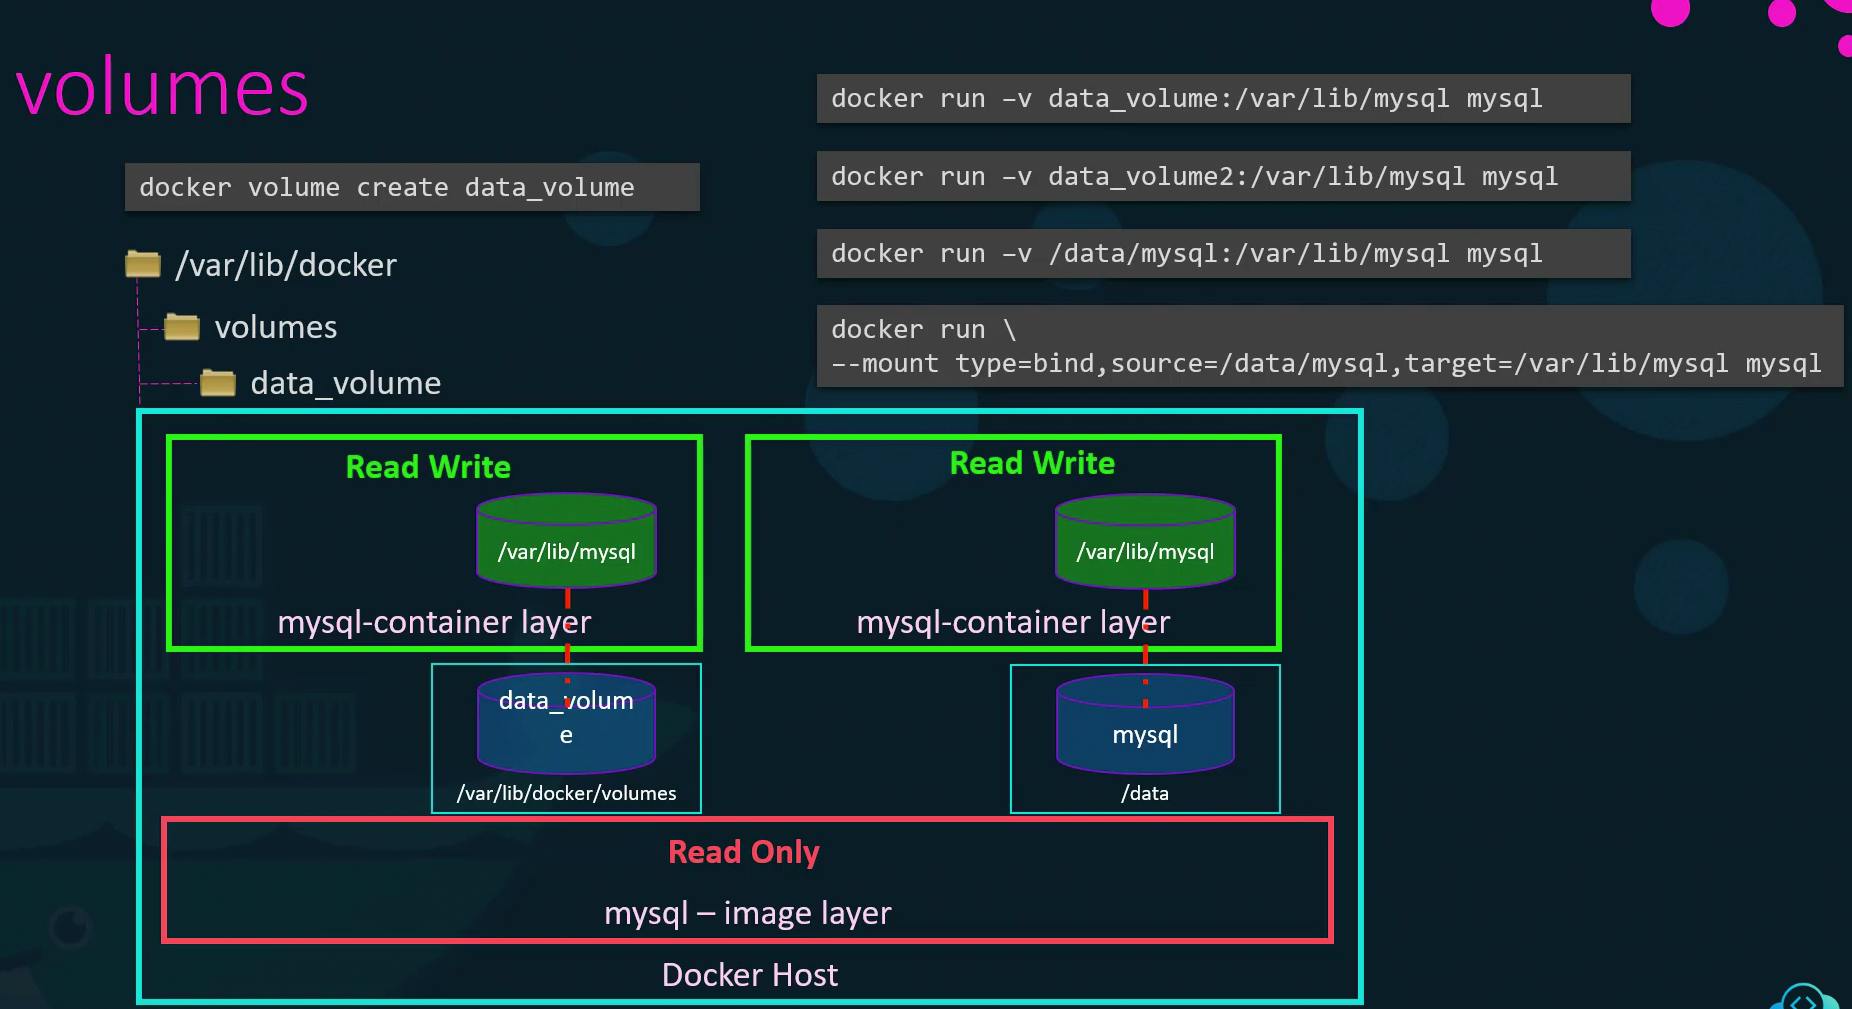
Volume
To persist/preserve the data created by the container, for this, we can create a persistent volume to the container.
Two types of mounts:
Volume mounting (It mounts a volume from the volume directory /var/lib/docker/volumes/ )
Bind Mounting (It mounts a directory from any location on the docker host)
Create Volume using an
volume createoption, This will create a folder in /var/lib/docker/volumes/<data_volume>
docker volume create <data_volume>Mount the Volume "data_volume" inside the docker container read-write layer using option -v.
docker run –v data_volume:/var/lib/mysql mysqlThis will create a new container and mount the Volume "data_volume" into /var/lib/mysql folder inside the container, so all the data written by the database is stored on the Volume "data_volume" on the docker host, so even if the container is destroyed the data is still live.
Even if the volume is not created using "docker volume create", still you can define the volume option, which will be created by docker automatically, while creating the container.
docker run –v data_volume2:/var/lib/mysql mysqlWhat if your data already exist at another location Or on external storage on Docker Host at /data and we would like to store database data on that volume, and not on the default volume /var/lib/docker/volumes/ folder?
In this scenario, we will provide the complete part of the folder we would like to mount i.e /data/mysql This is already called Bind Mounting
docker run –v /data/mysql:/var/lib/mysql mysqldocker run –v <Directory Or Volume to Mount>:<Mounting-Point> <Image-Name>
The new way of mounting:docker run –-mount type=bind,source=/data/mysql,target=/var/lib/mysql mysql

-- Run a MySQL container [in detached mode] named mysql-db using the MySQL image. Set database password to db_pass123
docker run -d -p 3306:3306 -e MYSQL_ROOT_PASSWORD=<DB-Password> --name <contianer-name> <Image>
i.edocker run -d -p 3306:3306 -e MYSQL_ROOT_PASSWORD=db_pass123 --name mysql-db mysql
Ordocker run -d --name mysql-db -e MYSQL_ROOT_PASSWORD=db_pass123 mysql
-- To execute cmd on Mysql Databasedocker exec <Contianer-name> mysql -p -e 'use <Database>; select * from <Table-name>;'
i.edocker exec mysql-db mysql -pdb_pass123 -e 'use foo; select from myTable;'docker exec mysql-db mysql -pdb_pass123 -e 'show databases;'
docker exec mysql-db df -h
-- Run a MySQL container and map a volume to the container so that the data stored by the container is stored at /opt/data on the host.
Use
Name: mysql-db
Password: db_pass123
Mysql stores data at /var/lib/mysql inside the container.
Host: /opt/data
Container: /var/lib/mysql
docker run -d -v /opt/data:/var/lib/mysql -p 3306:3306 -e MYSQL_ROOT_PASSWORD=db_pass123 --name mysql-db mysql
Ordocker run -v /opt/data:/var/lib/mysql -d --name mysql-db -e MYSQL_ROOT_PASSWORD=db_pass123 mysql
Docker Networking
When you install Docker, it created 3 networks automatically.
- Bridge :-(Default network a container gets attached to )
It is a private internal network created by Docker on the Host.
All Containers attached to this network by default and get an internal IP address usually in the range 172.17 series, the containers can access each other using this internal IP if required.
To access any of these containers from the outside world, you need to map the ports of these containers to ports on the docker host.
Another way to access the container externally is to associate the container to the HOST network. This takes out any network isolation between the docker host and the docker container.
None:- The containers are not attached to any network and do not have any access to the external network or other containers.
They run in an isolated networkHost:- It allows to access the container from the outside world.

User-defined networks
Associate Container with any other network using
docker run centos --network=none docker run centos --network=hostCreate Internal Network
docker network create --driver bridge --subnet 182.18.0.0/16 custom-isolated-network-nameTo list all Networks
docker network lsInspect the Network, to see the Network settings and the IP address assigned to an existing container.
docker inspect <Network-ID/Network-Name>
docker network inspect <Network-ID/Network-Name>
docker inspect <contianer-id/contianer-name>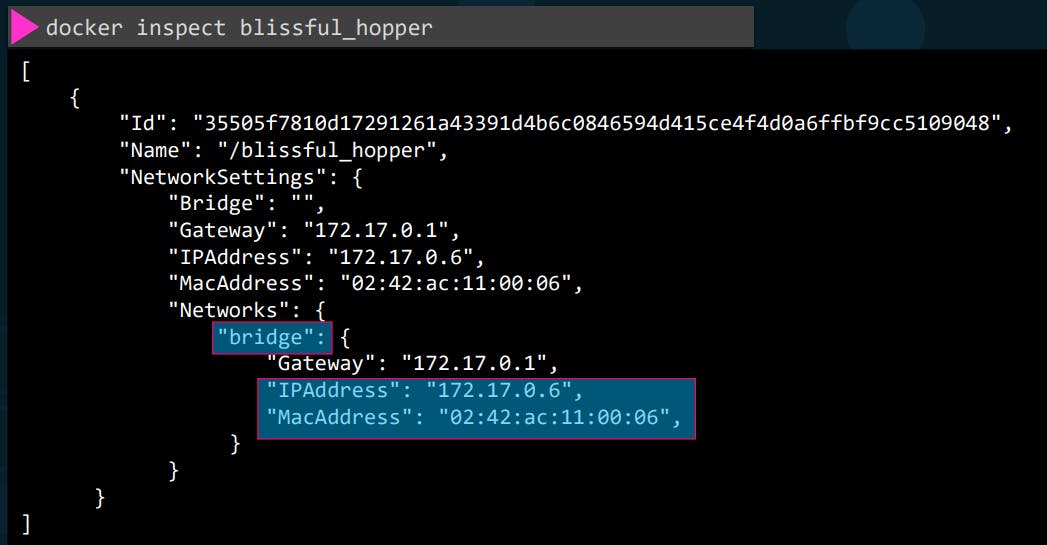
Notes:Containers can reach each other using their names
All containers in a Docker host can resolve each other with the name of the container. Docker has a built-in DNS server that helps the containers to resolve each other using the container name.
Note: The built-in DNS server always runs at address 127.0.0.11
-- Run a container named alpine-2 using the alpine image and attach it to the none network.
docker run --name alpine-2 --network=none alpine
Ordocker run --network none --name alpine-2 alpine
-- Create a new network named wp-mysql-network using the bridge driver. Allocate subnet 182.18.0.1/24. Configure Gateway 182.18.0.1
Name: wp-mysql-network
Driver: bridge
subnet: 182.18.0.1/24
Gateway: 182.18.0.1
Run the command:docker network create --driver bridge --subnet 182.18.0.1/24 --gateway 182.18.0.1 wp-mysql-network
Inspect the created network bydocker network inspect wp-mysql-network
-- Deploy a mysql database using the mysql:5.6 image and name it mysql-db. Attach it to the newly created network wp-mysql-network Set the database password to use db_pass123.
The environment variable to set is MYSQL_ROOT_PASSWORD.
Name: mysql-db
Image: mysql:5.6
Env: MYSQL_ROOT_PASSWORD=db_pass123
Network: wp-mysql-network
docker run -d --name mysql-db --network wp-mysql-network -e MYSQL_ROOT_PASSWORD=db_pass123 mysql:5.6
Ordocker run -d -e MYSQL_ROOT_PASSWORD=db_pass123 --name mysql-db --network wp-mysql-network mysql:5.6
-- Deploy a web application named webapp using the kodekloud/simple-webapp-mysql image. Expose the port to 38080 on the host.
The application makes use of two environment variables:
1: DB_Host with the value mysql-db.
2: DB_Password with the value db_pass123.
Make sure to attach it to the newly created network called wp-mysql-network.
Also, make sure to link the MySQL and the webapp container.
Name: webapp
Image: kodekloud/simple-webapp-mysql
Env: DB_Host=mysql-db
Network: wp-mysql-network
docker run --network=wp-mysql-network -e DB_Host=mysql-db -e DB_Password=db_pass123 -p 38080:8080 --name webapp --link mysql-db:mysql-db -d kodekloud/simple-webapp-mysql
Ordocker run -d --name webapp -p 38080:8080 -e DB_Host=mysql-db -e DB_Password=db_pass123 --network wp-mysql-network --link mysql-db:mysql-db kodekloud/simple-webapp-mysql
Docker Registry
It is a storage and distribution system for named Docker images.
DockerHub is a hosted registry solution by Docker Inc. Besides public and private repositories, it also provides:
- Automated builds
- Integration with source control solutions like Github and Bitbucket etc.

-- Private Registry - That can only be accessed using a set of credentials.
To run a container using an image from a private registry, you first need to log in with your Docker ID to push and pull images from Docker Hub. If you don't have a Docker ID, head over to hub.docker.com to create one.
docker login private-registry.iodocker run private-registry.io/apps/internal-app
-- Deploy a Private Registry within your organization
The docker registry itself is another application and is available as a docker image, the name of the image is "registry" and it exposes the API on port 5000.
Run the "registry" Imagedocker run -d -p 5000:5000 --name registry registry:2
Before pushing the images, re-tag them with the docker image tag command.docker image tag my-image localhost:5000/my-imagedocker push localhost:5000/my-image
docker pull localhost:5000/my-image
Ordocker pull :5000/my-image
-- Deploy a registry server on our own. Run a registry server with name equals to my-registry using registry:2 image with host port set to 5000, and restart policy set to always. Note: Registry server is exposed on port 5000 in the image.
Here we are hosting our own registry using the open source Docker Registry.
Container Name: my-registry Host Port: 5000 Image: registry:2 Restart Policy: always
Sol:
As the exposed port inside the image is 5000, we need to specify it using "docker run -d -p [hostPort]:[containerPort]..."
docker run -d -p 5000:5000 --restart=always --name my-registry registry:2
-- Push some images to our registry server. Let's push two images for now .i.e. nginx:latest and httpd:latest.
Note: Don't forget to pull them first.
To check the list of images pushed, use curl -X GET localhost:5000/v2/_catalog
Sol: Before pushing the images, re-tag them with the docker image tag command.
Run:docker pull nginx:latest
thendocker image tag nginx:latest localhost:5000/nginx:latest
and finally push it usingdocker push localhost:5000/nginx:latest
We will use the same steps for the second imagedocker pull httpd:latest
and thendocker image tag httpd:latest localhost:5000/httpd:latest
and finally push it usingdocker push localhost:5000/httpd:latest
curl -X GET localhost:5000/v2/_catalog
-- Remove all the dangling images we have locally. Use the below to remove them. docker image prune -a
-- To get the list of images use:docker image ls
Container Orchestrate
Container orchestration is a process of automating the operational effort, including the provisioning, scaling, availability, deployment, networking, and lifecycle management of containers, to run containerized workloads.
- Major Container Orchestration Tools
- Kubernetes
- Docker Swarm
- Apache Mesos
docker service create -–replicas=100 nodejs
docker service create: This is the Docker command used to create a new service.
--replicas=100: This flag specifies the number of replicas or instances of the service that should be created. In this case, it is set to 100, meaning Docker will create 100 instances of the "nodejs" service.
Docker swarm
The Docker swarm is one of the container orchestration tools that allow us to manage several containers that are deployed across several machines.
With Doker Swarm you could combine multiple Docker machines together into a single cluster docker swarm will take care of distributing your services or your application instances into a separate host for High availability and for load balancing across different systems and hardware
To set up a Docker swarm
You must first have Host Or Multiple Hots with Docker Installed on them.
Designate One Host to be the Manager / Master Or Swarm Manager
Using:docker swarm init
This will provide the command to be run on the workers.Copy the output of cmd you run on the Manager Node and Run on Salves Or Worker.
To Join the Manger Node: i.e
docker swarm join --token
After joining the Swarm the Workers are also referred to as NODES, and you are ready to create Services and deploy them on the Swarm cluster.
Swarm Manager:docker swarm init
Node Workerdocker swarm join --token
Node Worker-1docker swarm join --token
Node Worker-2docker swarm join --token
-- Run multiple instances on the cluster.
2 Ways
Run the
docker runcommand on each worker node. In this scenario, you will have to do all steps manually
i.e
Setup load balancing
Monitor the state of each instance yourself, and if the instances failed, you will have to restart them yourself as well.Using Docker Swarm Orchestration
The key component of swarm orchestration is Docker Services.
Docker Services are one or more instances of a single application or service that runs across the node in the swarm cluster.
Creating a Docker service to run multiple instances off "my-web-server" application across worker nodes in Swarm Cluster using:
docker service create -–replicas=3 my-web-server
docker service create command is similar to the docker run command
docker service create -–replicas=3 –-network frontend my-web-server
docker service create -–replicas=3 –p 8080:80 my-web-server
Note: docker service must be run on the Manager Node, and NOT on the worker nodes.
YAML

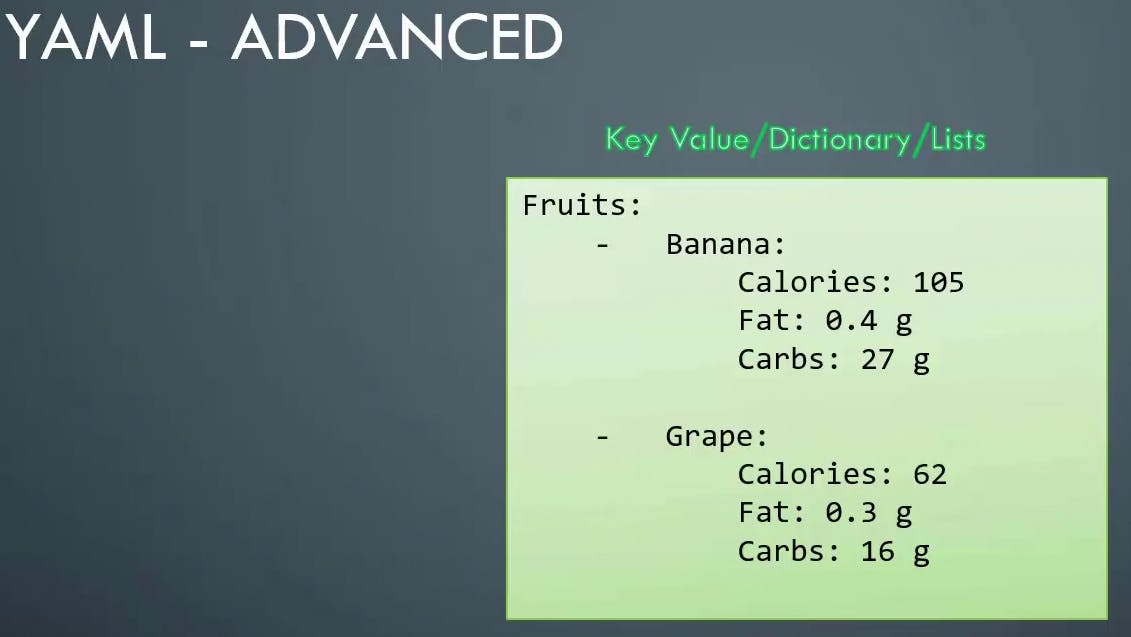
Key Value Pair:
You must have a space followed by a colon differentiating the Key and Value.
Array:
- : Dash in the front, indicates that it's an element of an array.
Dictionary:
Is a set of properties grouped together under an item. You must have an equal number of blank spaces before the properties of a single item, so they are all aligned together.